Thursday, November 1, 2018

3 Google AdSense alternatives that will help you monetize your website traffic

Whenever there’s a talk about website traffic monetization it very often comes down to Google AdSense. After all, for many website owners Google AdSense is the best way to monetize their traffic. Some even speak about it, like it is the only way to earn money from your website.
I disagree. Although in many cases AdSense is a very good choice, for many people it is basically not possible to publish ads for the Google’s network. For one, their website may have content that’s not accepted by AdSense policy, and we all know how strict they are. There may be other reasons about which you may read at our blog.
Luckily, the traffic monetization market is a huge one, so basically anyone can find a solution that fits the requirements perfectly. Thus, I present to you, the three alternatives to Google AdSense.

Media.net

If you’re looking for a direct alternative to the Google AdSense, Media.not is probably the best choice for you. It is basically AdSense but for Bing and Yahoo search networks. That means, you’ll still be working with contextual ads in all formats, shapes and sizes.
Media.net is characterized by their attention to detail and UX. There’s practically no chance that the contextual ad will stick out like a sore thumb from your meticulously crafted website. They understand that and try to fit in with their ads as best as possible. This ads are called native ads and if you love a harmonious and coherent design they will be your best friends.
Another thing that makes Media.net stand out from the crowd, is their dedication to customer support. The word is, every publisher get a dedicated account manager that will help him or her set up all the necessary details. They also be sure to suggest some tips if they find that you (and in the process also they) may earn more by optimizing the ad placement and types.
When it comes to requirements, there isn’t one fixed traffic requirement but the legend says, you have to have most of the traffic coming from English speaking countries like USA, Canada or UK. Also, your website has to be an English one.

Affiliate Networks

These are a bit different than AdSense and come in many different, sometimes very exotic, flavors. Some, like VigLink, specialize in in-text links monetization. Other in creating very specific sales funnels and an interesting approach to cookies policy, e.g. ClickFunnels have so-called “sticky cookies” which count a conversion from a user that will start in your funnel but convert on their own. The basic principle with these networks is that you’ll have to pick a product or service that you wish to advertise (and indirectly sell) at your website.
Good thing that comes with affiliate networks is that you can integrate with the network and start earning much faster than with Google AdSense. Additionally, some affiliate networks offer really niche products that aren’t available in other networks and surely aren’t available in AdSense. This creates big earning opportunities for some website owners. On top of that, most of the affiliate networks offer payments through systems such as PayPal, Payoneer and WebMoney. Good when you want to get your payment fast and you prefer anonymity.
The bad side to affiliate networks, is that is much harder to find the perfect network — one that will have a product fitting your audience but will be also a trustworthy partner. Still, when you dive deep into affiliate marketing, you may find it very profitable, as the affiliate ads usually pay better than the contextual ads offered by Google AdSense.

The space between — Interstitial and Intermediate Ads

If your not a big fan of adding contextual ads or you don’t want to spend hours on looking for the perfect affiliate network, these two formats may be the best for you. Interstitial ads are the full-screen banners that cover the whole screen of the host app and are preferred by mobile and app and games developers because of their high conversion rate. After all, the user can do only one of two things — either close the ad or click through it to the target site/app. The interstitial ads were invented with a basically mobile only environment, but it is possible to include them in websites that have a good mobile versions.
The second and the last type of ads I want to talk about are intermediate ads. These ads are placed on the intermediate sites. For example the user comes to your website and scrolls around a bit. Then, he or she finds a content that interests them so they naturally click on the link. Here comes the intermediate ad page with the ad units being properly shown to the users and right after that the user lands at their desired destination. This type of advertising is one of our speciality. For more info please see the Shorte.st website.
There are countless types of ads, networks and ways to monetize your website traffic. Just remember, that what is popular with other people may not always sit well with you and your website. For more articles on traffic monetization and earning money online, please visit our blog or add our Medium publication to followed. We’ll be uploading more exclusive content in the near future.

About the author

I work as a content marketing specialist and one of the community managers at Shorte.st. Content creator at the Shorte.st blog.

Monday, August 20, 2018

How to Increase the Size your Hard Disk Space up to 2TB in Window 10

How to Increase the Size your Hard Disk Space up to 2TB in Window 10
Increase the Size of your Window Hard Disk up to 2TB from Creating Virtual Disk feature in Window 10. With this trick, you can create Fake Hard Disk in your Computer with 2TB Size.

And the most interesting thing is you can save your data like movies, music and songs in this drive. But this virtually created hard disk linked with your computer drive.
With this trick you can show off your friends, you have more hard disk size than other people.

Increase the Size your Computer Hard Disk up to 2TB in Window 10

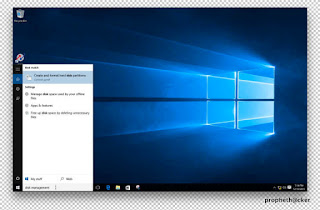
1. Search Disk Management in Window Search Box and select Create and format hard disk partitions.
2. Now you see Disk Management dialog box in your screen. Select Action in the menu bar and click on Create VHD in your Computer.
3. Now a new dialog box appears in your screen. First click on browse and make a .vhd file in any of your drives. Select GB  and put 1999 value in the box. Make sure you select Dynamically expanding option and click on OK button.
4.  Select Disk 1999GB, Right- Click on it and choose Initialize Disk.
5. In this box all things are already right, just click on OK button.
6. Right Click on 1999 GB Unallocated Drive and select New Simple Volume.
7. Click on Next button.
Click on Next button.
Click on Next Button.
Click on Format Disk and move to next steps.
Click on Start button and you successfully Create a 2TB Virtual Disk in Window 10.
Now You see 2TB Virtual Hard Disk in Window 10 from File Explorer.
You can create many fake Hard Disk in your computer as many as you want from this fake hard disk tutorial

Sunday, August 19, 2018

How to Disable Startup Programs in Windows 7 and 10

How to Disable Startup Programs in Windows 7 and 10
Lots of Startup Programs in Window PC slow down computer performance. In this post, we tell you how can you increase your computer speed from disabling these startup programs in Window 7 and Window 10.

What is Startup Programs in Window?
Startup programs run automatically when Windows boots up. They start every time whenever you start your window PC.
Now you know what is startup programs. Disabling these programs surely increase your computer speed and performance. If you want more tips for speed up your window PC read our article on this topic.
 How to Speed up a Slow Computer

How to Disable Unknown Startup Programs in Windows 7 and 10

How to Disable Unknown Startup Programs in Windows 7 

1 Press Window + R button and type msconfig in the box.
2. Now you see a dialog box appears in your screen with a list off all startup programs. Deselect the programs that you want to disable in the startup. Or you can disable all and click on apply button.


Disable Startup Programs in Window 10

  • Like below screenshot Right Click on the taskbar and select Task Manager.
  • In Task Manage choose Startup Tab and you see you all window startup programs.
  • Select Programs and choose the disabled button for disabling startup programs in Window 10.

Disable Startup Programs in Window 7, 8 and 10 from third party software – CCleaner

Download CCleaner from its official website install in your system. CCleaner also increases your system performance from many tasks.
Like below screenshot go to Tools section and select Startup option. Now you see your all Startup window Programs with all details. Disable the programs that you don’t in the startup.

    For Disabling Startup Programs in Android Mobile see below guide and like above this trick also increase your android mobile performance.


    How to Transfer Movies,Music and Data Between Two Laptops Using WiFi(Without LAN,WiFi Router and Internet)

    How to Transfer Movies,Music and Data Between Two Laptops Using WiFi(Without LAN,WiFi Router and Internet)
    Generally we share data between two laptops using Pendrive. If we have WiFi router we use wi-fi network for transferring data between computers/laptop. If you don’t have pen drives or wi-fi router you use LAN cables or internet.

    But what do you do if you don’t have anything.In this post, we show you how can you share data between two laptops from wifi network without any wifi routers or cables.
    If you share data between two computers by sharing drives from window settings. Believe me, that method is sometimes very irritating. You don’t wanna share your personal files and you don’t have time for setting permissions in window folder and drives.
    Here we use Minishare and Shareit Software for sharing data between two laptops using wifi but different ways. Read this post and know how to transfer data between two laptops using wifi.

    Minishare: Share Data Between Two Computers/Laptop from Browser without WiFi Router or Network Cable.


    First You need to Connect your both laptop with one network from creating a wifi hotspot.Use below guide for how to create the wifi hotspot in the laptop without any software.

    Turn your Laptop into WIFI hotspot in One Click Without Software

    Minishare is one of the most lightweight software for sharing data between two computers. Minishare transfers your data from your browser. Just add your files in Minishare you wanna share with another user Laptop . This is simple and easy to use and working in every situation.

    Download Minishare Software from its Official Website. Install this software in your Window Computer and proceed to below steps.

    Make sure you allow Firewall Access to this Program in your Window PC.

    Instructions for Sharing Data Between Two Computers/Laptop Using Minishare Software

    1. Download, install and open Minishare Software in your PC. Choose your Local IP.(eg: 192.1168.137.1)
    2. Add Files in Minishare for Sharing Files between Two Computers.
    Note: You can also add your files like movies, music, and data from dragging your files to the Minishare Program.
    3. Now you see your added files in Minishare Program.
    4. Open Second(Other) laptop web browser and type the IP address you selected in Minishare.(If you forget the IP address see Minishare program in First PC, Minishare always shows current IP in title bar.)
    Just click on any files and your file will we started downloading in your PC.

    Lock and unlock your computer with a Pendrive [Hacker Style]

    Lock and unlock your computer with a Pendrive [Hacker Style]
    We do this thing from an amazing software named Predator. This software turns your Pendrive into a password. Without your Pendrive, you can’t access your PC. If you unplug Pendrive from your PC your PC will be locked. This is one of the most advanced security for any computer user.

    Lock and unlock your computer with a Pendrive, Hacker Style

    1. Download Predator USB software from its Official Website for 9 days trial.

    2. Install and Launch this software in your window PC.

    3. When you launch this software first this software asks you to set the password.
    4. Set your password and click on Ok button. (Make sure your Pendrive is connected to your PC.)
    5. Now this software is ready for locking your computer from Pendrive.

    6. Open Predator Settings
    Here you set time interval according to your needs.The default time interval is 30 seconds. If you remove Pendrive from your computer you computer will be locked in 30 seconds.

    When you remove Pendrive from your computer your computer asks you enter your password with the warning.


    If you do not enter the correct password, you computer screen goes black with access denied message.


    Start Automatically Predator Software When you Start your PC 
    If somehow this software not automatically started when you start your computer then add this software in your startup folder.
    1 Press Win+R, type shell:startup and press enter.
    2.  Now add Predator Shortcut icon in Startup Folder. You can copy it from the desktop.
    PREDATOR protects its own in-memory process. Nobody can stop it with Ctrl-Alt-Del. PREDATOR can sound an audible alarm if somebody enters an invalid password.

    You can also see logs for all messages, warnings, fail login attempts and all other information.